What skills do you need as a Junior Compositor?
Whether you just landed your dream job as a Junior Compositor or you’re still flicking through dozens of job advertisements and are unsure on what the future holds, this article’s for you.
It’s important to acknowledge that being a Junior in the visual effects (VFX) industry doesn’t mean you’re stuck compositing in the junior league. Instead, it gives you an opportunity to build on your experience and gain skills you can utilize later on. Just like how adding one single node can have a huge impact on a complex shot, this type of role and the ways you make the most of it, can influence your career journey.
In this article, we look at how you can stand out as a Junior Compositor and find out what VFX studios look for. You’ll discover which techniques you need to focus on and get tips on how to work efficiently, so you can deliver high-quality composites.
Ready to discover which skills can help you break down the wall of competitiveness in this industry? Let’s just dive right in!
First key for your keychain—organization
Thinking about script organization and habits makes the top of the list. Why? Because it’s one of the simplest changes you can make that will have a huge impact on becoming a better compositor. As a student or a recent graduate, you’re probably used to working with small groups of people and you don’t need to share many of your scripts because structure and organization aren’t a priority. But this changes when working in a larger company—you often collaborate with hundreds of artists. A single shot goes back and forth between departments and there are often multiple artists working on it. That’s why, you need to ensure that all of your scripts are well-organized so they’re easy to understand and troubleshoot for whoever comes across them and needs to make fast changes.
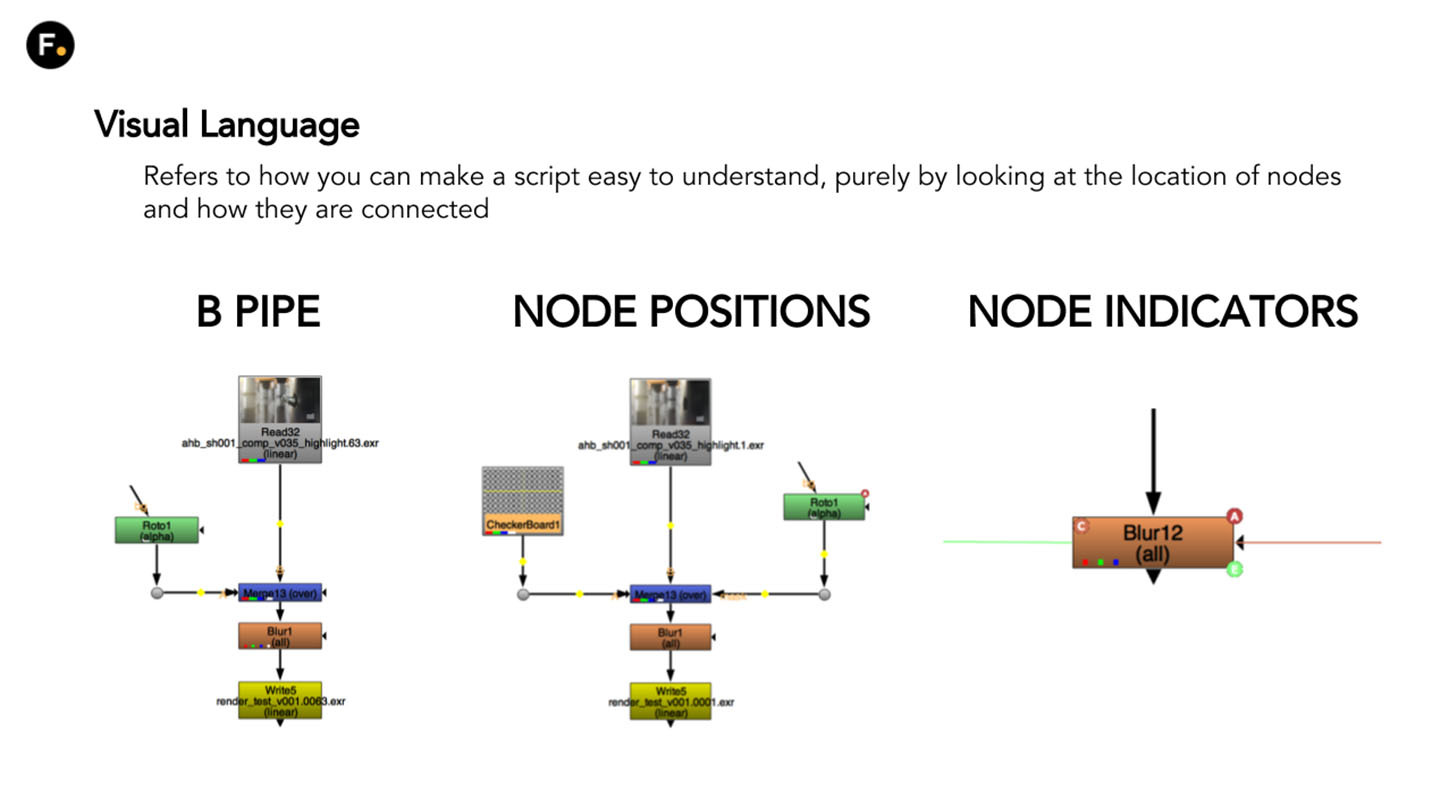
So how do you make the scripts easy to understand? You develop shared visual language by looking at the location of nodes and the ways they are connected to each other. Visual language not only helps you work with your scripts in an efficient manner but also makes it easier to work with other artists. It’s important to note every company has its own visual language and, in time, you’ll learn what kind each company prefers. But even starting out with organizing your script by having the B pipe always be the spine of your script, having masks on the right and added elements coming in from the left, will be a great starting point. This makes it easy for anyone working with the script to understand it and also means that, when troubleshooting, you can easily determine what's happening at different sections of your script from a more zoomed out perspective in the Node Graph. Having a basic understanding of this concept and acknowledging its importance is going to help you in developing your scripts and improving them.
When building scripts, it’s also crucial to make use of the modularization concept. Modularization represents the act of separating your script into sections that contain unique tools such as a Tracker node or a Grain node. Modularization gives you the ability to quickly disable and enable sections of a comp and comparing the effect you were creating when it’s there vs. when it isn’t. This is helpful for troubleshooting, evaluating your work, and making it easier to break up a script if you need to. By using modularization, you also have the added benefit of simplifying the way you can see duplicate tools. For example, if you have a tangled script and you apply a number of Grain nodes in different areas, you might find that not all of those nodes are necessary in several different places.
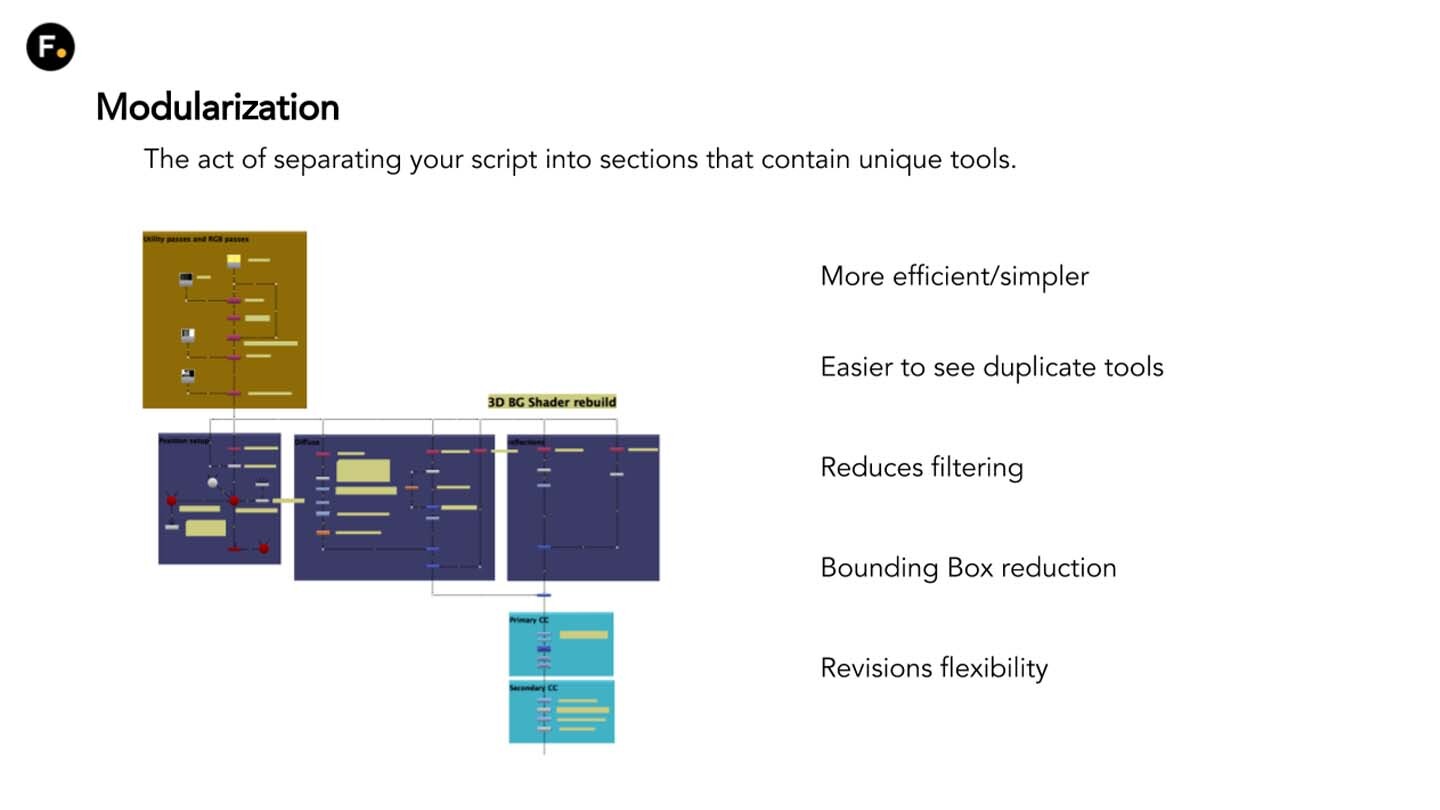
You’ll want to consolidate the nodes and use a single Grain node on the foreground elements before you merge it over your background—modularization will help you achieve that. And it’s not just that—every time you apply an effect or a node, you’re modifying the original image in some way. As a Compositing Artist, you should aim to retain as much of the original image as possible. Developing a habit of using modularization will help you save time and allow for increased flexibility. Another benefit is related to revisions. Once you finish a script and send it off, it’ll always come back with some changes—some of them more complex than the others. So, modularization will support you in preparing the script ahead of time so that if changes occur, there’ll be no surprises and you’ll be able to act on them right away.
What not to do
While we’re talking about things that you should do, let’s talk about what you shouldn’t do as well. One common mistake you might be tempted to make is starting to work on a shot straight away. If you want to stand out and prove you can do magic with compositing, take the time to plan. Studios appreciate those who map out what they need to do, what problems they might encounter in a shot, what approaches make sense, what changes should you anticipate and concentrate on how they can deliver a high-quality shot—even if it's a quick ten minutes. Here are some questions you could think about depending on the shot you are working on:
- What are the best workflows for this shot?
- Are there any edges to think about?
- How should I structure my script?
- What revisions might occur?
- If you have a show where you want to key, what’s the best keying method to use?
- What problems might occur when using the keying method chosen above?
Another common mistake made by Junior artists is not working within the original format that they’ve been delivered. The first thing they do is reformat a shot to the deliverable format. If a revision occurs that changes the format, updating the reformat to match won’t work. Why? All the adjustments from the transforms and everything else you created afterwards will be affected by the change in the Reformat node. Having the Reformat node at the top will change the way everything flows. It’s better practice to place the Reformat node at the bottom of the module you are working on and you’ll have the ability to make revisions without affecting the adjustments and the logic. Remember this the next time you’re working with different footage types and formats. Doing so will also allow you to work with the full resolution of assets or textures you are bringing in, and ultimately you won’t be introducing more changes than necessary to the original image.

Part of the organization plan is also adjusting the bounding box, which you should commonly aim to keep efficient unless you have a specific reason. If you avoid doing that, you’ll end up processing loads of unnecessary pixel information and data which will make your comps slower and slow you down as a result. You should be mindful of how you merge your bounding boxes when using a Merge node and make an active decision on how you want that bounding box to incorporate into your script.
Channeling your attention into channels and filtering
It may not be a surprise that, in production, you’ll be working with multi-channel EXR files which will have loads of channels inside of them. Having access to them is your ticket to retrieving great information that you can work with and build upon. The first thing you should do is review those channels, carefully examine them, and determine how efficient they are in order to see if among those channels are some unnecessary ones: repeated alphas, duplicate data, and black and white images using RGB channels instead of just one representing the data.
You should find those channels, isolate them, and remove them by using the Shuffle and Copy nodes which help reduce the number of layers you’re working with in the multi-channel EXR. The benefits? You’ll speed up the process and will be more informed on how you can work. Understanding how to work with channels and use them creatively in order to maintain data throughout your comp will give you more flexibility and open up quicker ways to work. It will also contribute to keeping your scripts organized and you’ve already learned the importance of that.

We’re halfway through with the list of things you should keep in mind as a Junior Compositor. Let’s add another one!
When compositing, filtering is inevitable as it occurs whenever you make a modification to your image. Almost every operation in Nuke will create a filtering hit, so you can’t avoid it but you should know it’s part of your role to ensure that you maintain as much of the original high-quality image quality as possible.
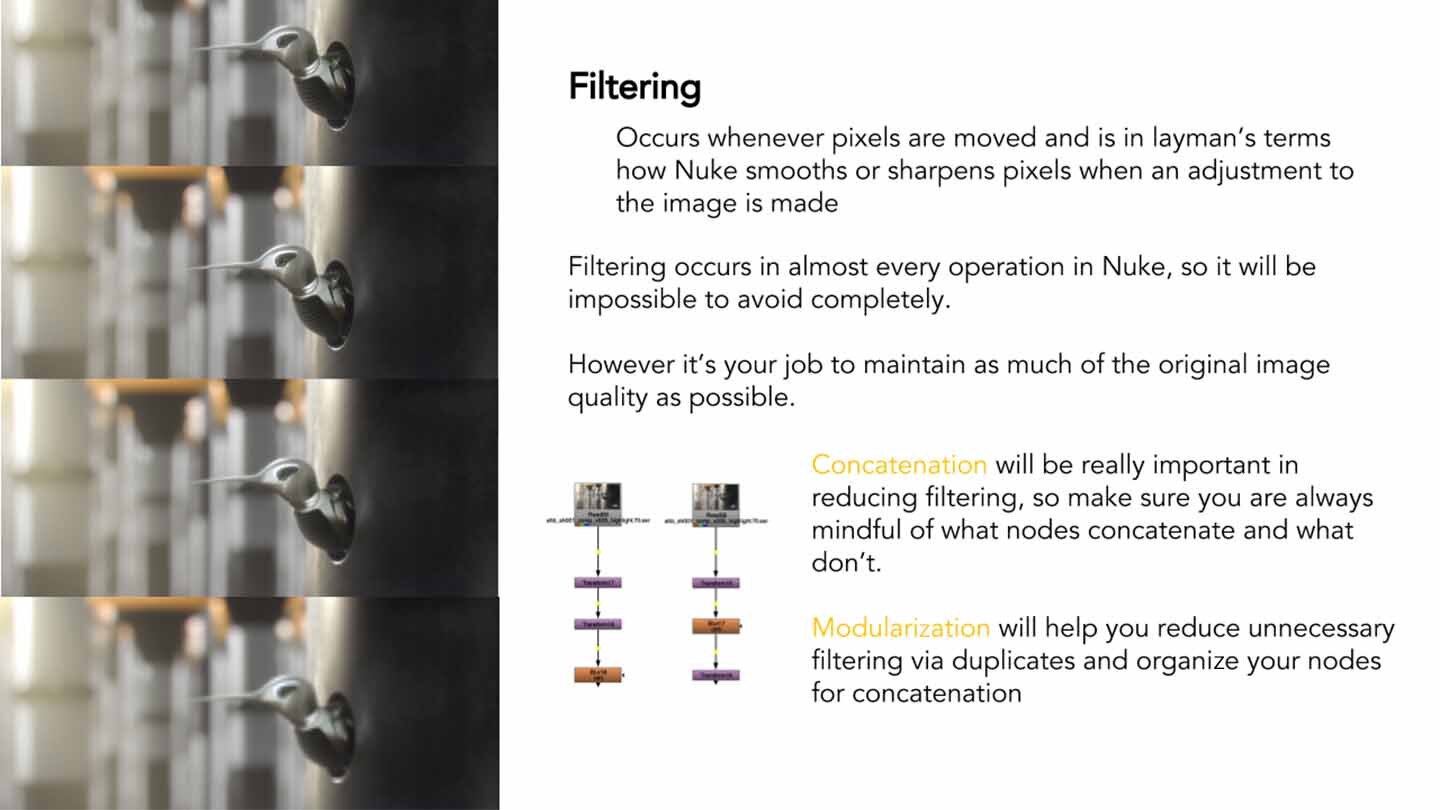
Concatenation is important in reducing filtering, so always make sure that you think about which nodes concatenate and which don’t. This will help with preserving the image quality. Our tip for you is to create a ToolSet of concatenating nodes which you can quickly reference in any script.
Photography, light and…math
Here’s a statement to remember: photography and light are the underpinnings of great compositors. Large VFX companies often say they’ve seen many artists coming in to work with them without an understanding of principles such as photography, color or light. But what you should know is that these principles are fundamental to becoming a great compositor. They’re going to be your guide in making any decision and action you perform in Nuke.
The believability of your end result is directly proportional to your knowledge and understanding of the physics of what happens when you take a photograph and the ways the light interacts within that physical space and camera. Your job is to make everything in the scene look like it was photographed at the same time and by the same camera.
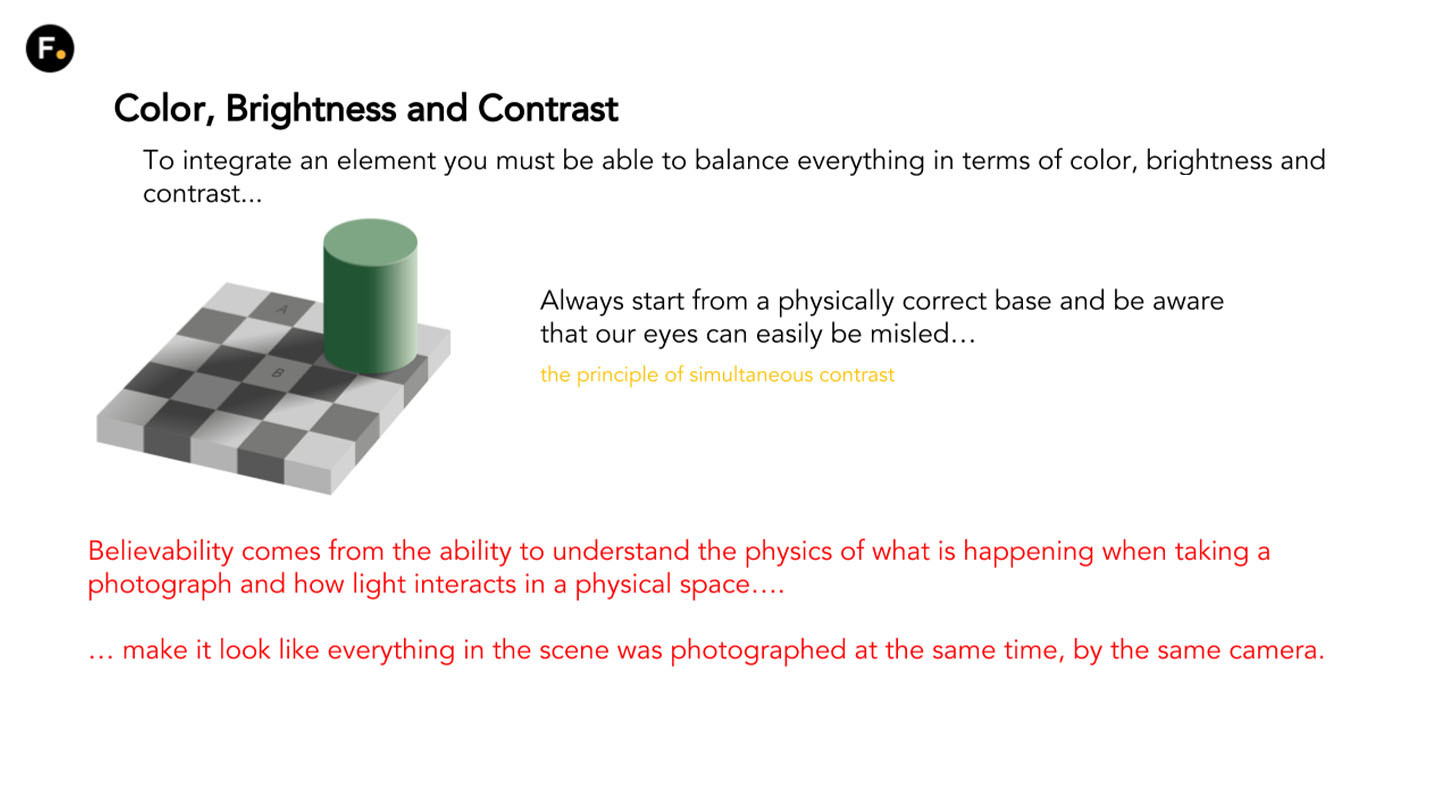
For starters, you should look into color, brightness and contrast so you can integrate all these different elements. One good example of this is the principle of simultaneous contrast—acknowledging how your eyes can be misled is crucial as you need your comps to always start from a physically correct base. If you see something that isn’t physically true and you don’t realize that your eyes are being tricked, how are you going to make the correct decision for your comp?
It’s also important to know camera basics because, as a compositor, you have to integrate elements that need to look as if they were shot from a camera. You should know—or start to learn, it’s never too late—how to manipulate the camera’s ISO, shutter speed, and aperture. Having this knowledge will help you analyze a shot in order to see the luminance, the motion blur, depth of field, and camera artifacts.

Keep a tab open in your mind with the depth of field of the shot you are working on. Remember that the depth of field is proportional to the square of the distance, so if you double the subject’s distance away from the camera, then the depth of field quadruples. You should also think about perspective because, as a Compositing Artist, you’ll be manipulating distances and size relationships all the time. It’s good practice to know how they interact in the real world and through a camera lens. If you have a scene where an object is coming towards you and it’s overlapping a lot of things, you need to have the ability to replicate this effect accordingly, otherwise it won’t be as believable.

Familiarize yourself with lens flares and artifacts. When lens flares occur due to overexposure of the image sensor, they usually cause multiple reflections in the lens assembly and this is why it might look like there are multiple artifacts instead of just one. Keep in mind that nothing should ever move in front of a lens flare. The only time the lens flare should be affected is when the light source gets obscured or some similar scenario. When combining an element such as a CG rendered pass—which is usually rendered with a perfect lens— with an element filmed with real-life lines, be mindful of the merging process as a real-life lens won’t produce perfect results.
Remember that being a good compositing artist is not just about the art itself, but about the math behind the scenes too. Compositing can be defined as visual math and understanding why you use an operation, how you use it, when you use it, and what it does will help you become a much better artist that makes informed decisions and who picks the right tool for the right task.

Knowledge is your best asset
So what should you focus on when starting out as a Junior Compositor to ensure you make the most out of your role and also stand out? Take the time to plan your shot, organize your scripts and utilize concepts like modularization and visual language to help you with that. Become your own manager for your workflow and manage your bounding boxes and channels. Think twice before adding a node and take into consideration filtering or any revisions that might come up. Try your best to understand the visual math of Nuke and learn the way cameras and light work in order to achieve the best realistic results. Combine your critical thinking and artistry and dare to think outside the…scripts!
Start building your professional network by gaining access to people you might not have met otherwise and get your foot in the door to 30+ award-winning VFX, animation and games studios through our partner ACCESS: VFX.
Find out more about the free mentoring program and sign up here!
Upgrade your artistry with these tutorials
Have you tried out Nuke yet?