Gaël Kerchenbaum tests out the latest Mari development
An exclusive look at the new Mari Materials System in action
Gaël Kerchenbaum is a freelance character-creature artist, and tutor.
He’s worked at studios including Bacon Picture, Noemotion, Capsule Studio, Axis Animation and MPC, where he was part of the team who gave birth to the animals of Jungle Book.
Gaël is one of the first people to get their hands on Mari’s long awaited Materials System, which was recently made available as part of the Mari 4.5 release.
We caught up with him about his experience of using the new Materials System to create the stunning assets accompanying this article.
FOUNDRY (F): How did you first come to use Mari?
Gaël Kerchenbaum (GK): I started to use Mari in my last year of studies at ArtFx, between 2013 and 2014.
At that time, it was one of the tools you needed to know if you wanted to find a job in the VFX industry. Today, that’s still the case.
I learned Mari on my own and fell in love with it. I’ve always been into modeling, and Mari has been a natural bridge for me to get from modeling to surfacing. Thanks to this tool, I learned to greatly increase the quality of my creatures and push them to the level of realism I was after.
I’ve never found any other texturing tool that made me feel as in perfect control of my surfacing workflow. Being able to texture displacement in real time, to show a flat display of my current map, and to have a preview of what my render would be in the viewport is something I’ve always needed.
And this is just a small glimpse of what Mari can do.
F: You’re one of the first people to get their hands on the new Mari Materials System. Take us through how you used it.
(GK): As a freelance creature artist, it’s really important for me to find quick and efficient ways to produce work for my clients. It’s also important that I can be proud of the next creature I’ll add to my portfolio. When Foundry asked me to try out the new build of Mari, I wanted to take one of my old sculptures and push it from a simple 3D model to a beautiful render. I like to create models in 3D that look like collectibles or actual statues.
So the idea was to create hard surface texturing on an organic model with different materials and level of dirt and erosion.
To be honest, before Mari 4.5, I would have done it the same way within the software; the nodegraph was already amazing for that.
However, the difference now is that I can build my own marble, bronze, gold and patina materials. It took me a couple of hours to get used to it, but after some investigation, I managed to build fully procedural shaders that I could customize on the go.
A couple of hours to create my own materials, which will be easily applied in a few minutes for my next projects… this is exactly the kind of tool I was looking for!
Another difference here is that depending on how I’m feeling, if I’m not satisfied with an aspect of my texturing, I can dive back in the nodegraph of my material and change it to whatever I prefer.
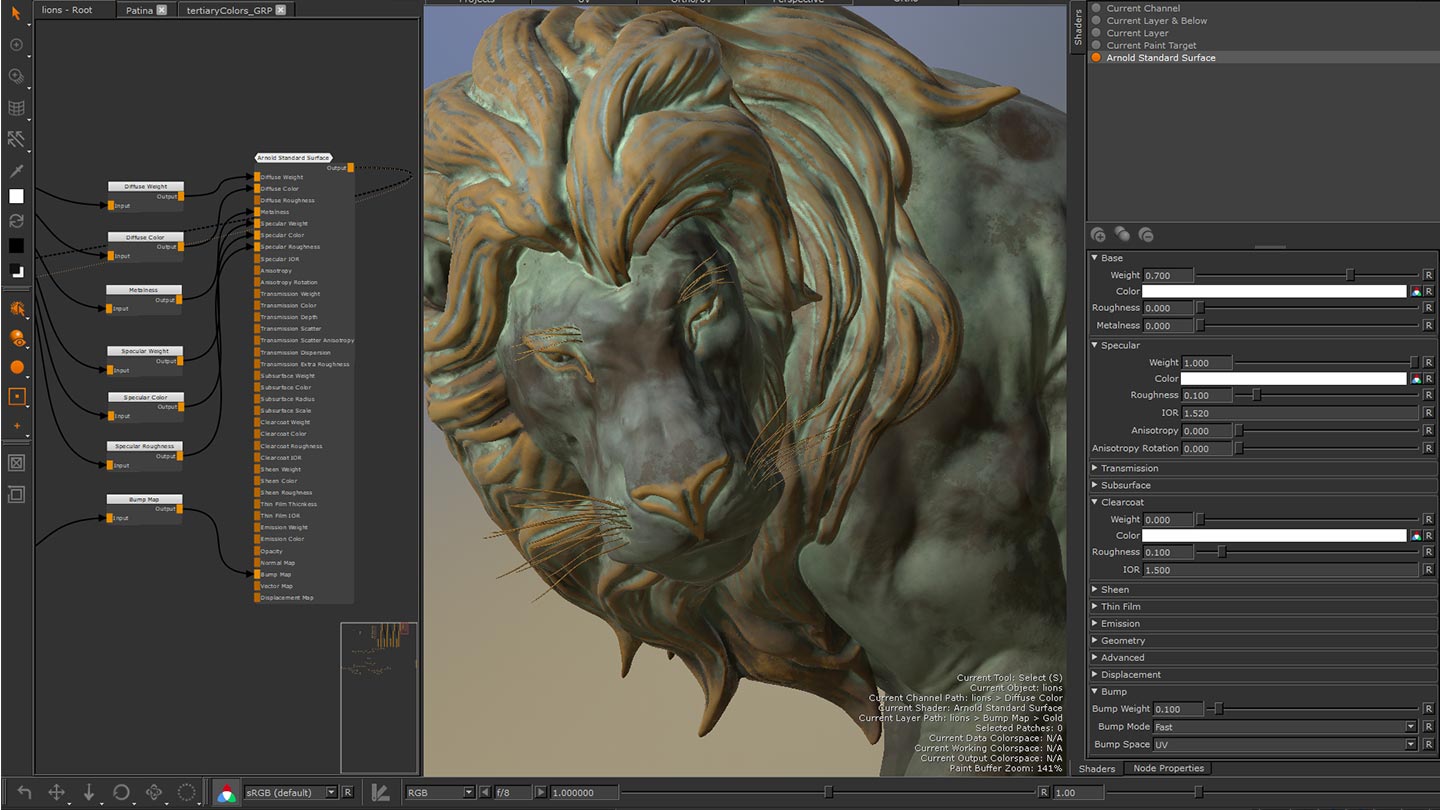
(F): How did it feel to have a procedural Material workflow inside of Mari?
(GK): I never liked to do texture projections. The only textures I’m projecting in Mari are displacement maps coming from TexturingXYZ. I’m always trying to find a way to create fully procedural albedo, specular and roughness maps. I believe it’s the only way to create texture-bound-to-surface information.
The other issue I have with texture projections, especially on albedo (diffuse) maps, is that you can spend ages trying to kill the specularity or shadow from your scans. Even when they’ve been cleaned, details will be lost and missing contrasts.
For this reason, I’ve always embraced the procedural workflow. I did it with a layer-based approach before, and I've already fallen in love with the nodegraph in a few weeks.
The material workflow has helped me push efficiency even further, by exposing a node’s settings within my material’s properties.
(F): Could you give us a quick run through of the process you went through to put the assets together?
(GK): To be honest, I was a little bit sceptical about being able to apply fully procedural materials through a lot of UDIMs without an impact on performance in the viewport.
But I decided to give it a try and to unwrap my model into a lot of UDIMs anyway.
Once done, I imported my UVs back into ZBrush, then went back to a mid/high poly level of sub-divisions. I decimated all my subtools and kept the UVs.
When working in Mari, it’s important for me to have a sense of the details, close to what I’ll get with displacement with Arnold. All the subtools were in one OBJ that I imported into Mari.
It took me a little while to find the best way to build a material in Mari’s nodegraph. At the beginning, I was trying to build every channel at once.
Don’t do this.
The best way to build a shader is to start with only one map. Depending on the kind of material you’re after, dielectric or electric, you’ll have to build the tree for the most representative channel.
[Electric materials are primarily metals and the surface color affects the specular reflection. Dielectrics are most commonly non-metal surfaces where the surface color does not affect the specular reflection]
Then you’ll be able to break it down into your other maps.
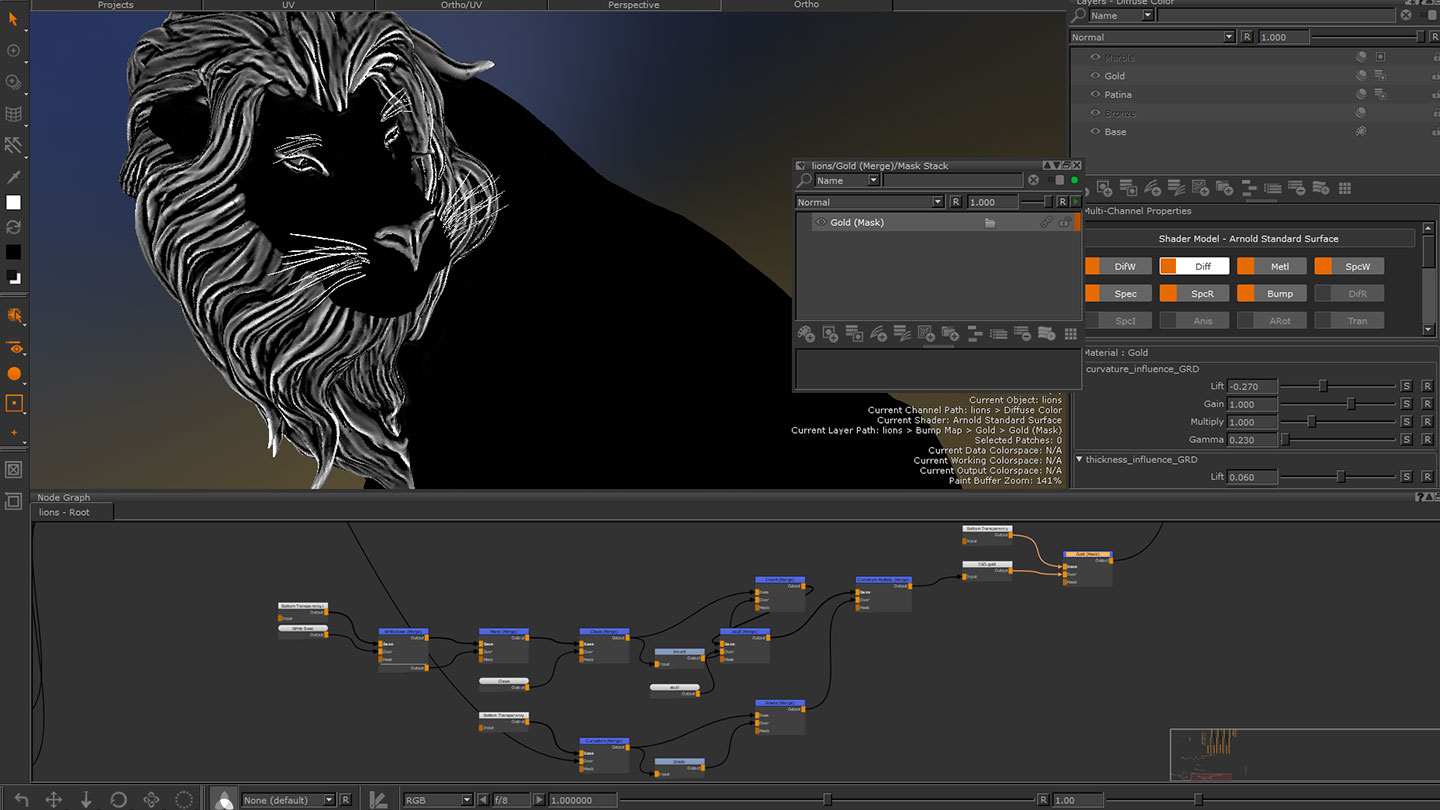
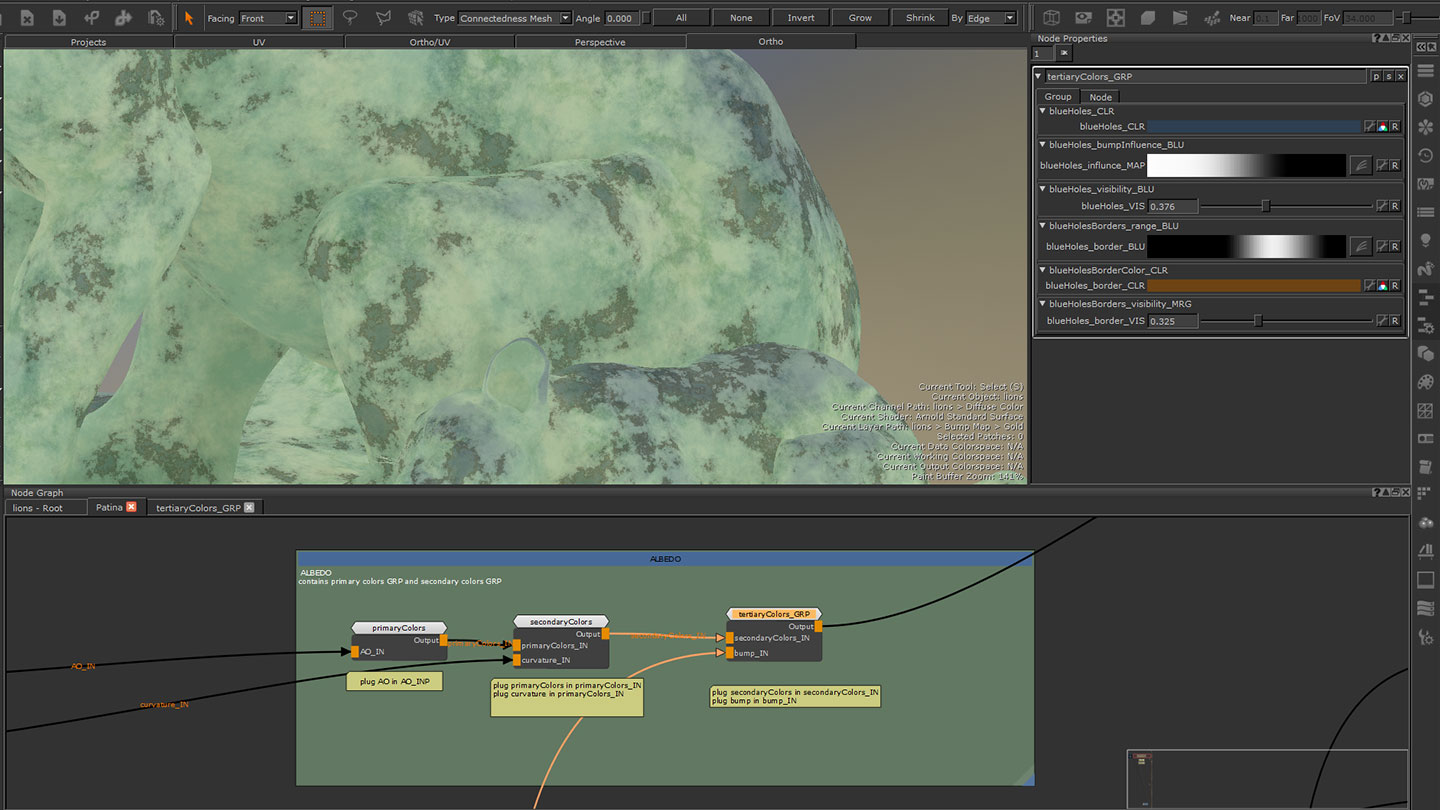
Decide first if you want to build the albedo, specular or bump. Fill all the other inputs with a color node corresponding to the default shader input value. If you decide to start with the albedo, build first your primaries with color nodes. Merge them and use procedural ambient occlusion nodes as a mask. Grade these masks with brightness lookup (for example).
Once done with the primaries, work on the secondaries using HSV or HSL nodes. Use different procedural clouds as masks when merging them together. Then add tertiary colors to add even more details and dirt in the ambient occlusion.
With the albedo done, you can then create your bump and specular map. Use different clouds that will be graded with grade or brightness lookup adjustments to give volume to the bump. Then merge them together.
Simply plug them into your material inputs to see the impact in the viewport. When you have a base for these two maps, use the procedural clouds from your albedo map and plug them ask masks into your bump, specular and roughness. This will give you a perfect correspondence between your diffuse and your scalar maps.
(F): Moving forward, do you see the Materials System allowing you to tackle a wider range of look development with Mari?
(GK): Definitely! I don’t like to spend too much time waiting for a render before seeing the impact of my textures.
The Mari viewport has always been a way for me to keep pushing my look dev skills.
When working on a production environment as a texture artist, you need to be aware of the raw values coming out of your maps.
The ability to see these values clearly with a flat display in the viewport, and then to switch on to the preview of my shader is a must.
The fact that Mari now integrates the latest iteration of Arnold’s surface shader will help me to save even more time without having to push things to the rendering engine.
(F): As an artist, what do you see as the core benefits of being able to create both really detailed assets and higher-volume (but less detailed) assets, in a single package?
(GK): It’s clearly a production efficiency. Being able to go into really high detail on a model always seemed complicated. However, for a couple of years now thanks to Mari, it’s now just a matter of hours.
The ability to go into as much detail as the timescale of your production allows is great.
Now with the new Materials System, you’ll be able to texture high volumes of assets almost automatically and be confident they’re looking realistic, while taking more time to focus on your hero assets. This is definitely a huge time saver.
To me the most important thing - and one of the ways I decide on my toolsets - is to focus on the artistry. When I present a model to a client, it’s important to be able to sell the piece.
However it’s also key as a freelancer to be aware of the time needed for production. Having materials that have been developed ahead of time, with my own workflow so I can customize them quickly and easily apply them to my assets, will be a huge time saver.
This will also allow me to spend more time on the important fine-tuning, like making my sculpture more accurate and detailed, while ensuring the texturing is ready so the production can keep moving on.
(F): Do you have any tips or tricks you could share that make using the Materials System easier?
(GK): The danger with materials is that new artists might try to tackle every aspect of their texturing at once.
I’ve always warned my students against that when teaching look development. It’s REALLY important to be able to read each channel individually - and to have a clear idea in mind of what the result will be, just by looking over a flat map.
The viewport showing a real-time preview of your rendering engine should just be an additional tool to confirm the values of your maps are making sense. For this reason, you’ll need to work on each channel of your material one by one.
Another shortcut I found during the development of my marble material was to create procedural ISO (isolation) masks before everything else.
The idea here is to build a black and white mask for each pattern. Then you’ll plug this mask into your albedo to control the repartition of a particular color.
Plug it into your bump channel to add some elevation, or into the specular and roughness to control the aspect of the shader.
My last tip, and I’d like to thank Charli from the Mari team for this, is to group each tree of your material into groups per channel. A material is a hero group, which can contain a subgroup.
You want your subgroups to correspond to a channel. Then expose the knobs you want to maintain control of each subgroup, without having to dig in. Rename each of the exposed knobs with a clear and simple name. This will ensure your material properties are understandable when they’re exposed.
(F): In general, what does Mari allow you to do that would either be impossible or much more difficult in other tools?
(GK): UDIMs and full correspondence of my surfacing between all the aspects of my work.
I’m not only a modeler, but also a texture and look development artist. I work almost entirely on creatures. They need to look real to my clients, who are expecting to be able to use them for close up shots.
Mari is the only tool that is able to reach this level of realism with a non-destructive and production-efficient workflow.
Keeping everything procedural is really important. Sometimes, I’ll be asked to modify my models after the texturing has already been done.
Because I’m using masks generated from my geometries to control all of my surfacing, I simply have to recalculate my ISO and update them in Mari to automatically regenerate all the Channels.
(F): Thank you for your time Gaël - and for the fantastic assets you produced!
